1.27.2011

Bread Crumbs: Bird is the Word


Hendrix taught himself to draw birds....lots and lots and lots of birds.


Apparently the card with 2 birds on it are ducks—to be specific—the one with a long neck is actually a swan and some birds are sitting in nests. There's PU-LENTY more where this came from...plenty.


*art installation courtesy of Hendrix himself.

1.21.2011

Hendrix and the Purple Crayon: Birthday Invite Year 5


I didn’t design any invites for Hendrix’s birthday last year since we had had a private family party so I'm going to move right along to this year’s invitations which were designed with the theme; Harold Hendrix and the Purple Crayon (after the book by Crockett Johnson).

As you might remember, Harold—the little boy in the story—creates a world of adventure for himself with his imagination and the use of his magical purple crayon. I wanted to tie this idea into the design of the invitation and yet I wanted the message to be comprehended should the receiver be unfamiliar with the old tale. I did this by blatantly informing the reader the theme for the party right in the text of the invite (click photo to enlarge). I also included a notebook and purple crayon for the receiver to draw their own adventures.


For the notebooks I adhered various patterned washi paper to a thick cover stock for the covers and for sketching paper I just used a plain white 20# stock. I bound each 5” square book together with a thick needle and purple embroidery thread. 


Formatting the information for the invitation was the quickest part of this project, (binding the books took the bulk of my time). The party info was printed on a linen paper and then wrapped around the notebook as a belly band. The band held the notebook nice and flat as well as housed a purple crayon which was slipped right underneath to complete the look. I had originally planned to attach the crayon another way but after much experimentation, this simple solution was the most aesthetically pleasing.

Well, that covers it a week of birthday invitations, we should really do this again sometime. And in case you missed it, check out year one's Buggy invites, year two's Car Cruising invites, and year three's Messy Party invites. 

P.S. As a piece of unsolicited advise; I highly recommended you hand deliver your 4 year old's birthday invites to their friends parents rather than have him hand deliver them himself to his friends. This will prevent an eager child from tearing off and discarding the important details to an upcoming party before their parents ever set eyes on the information and then you won't feel the need to email all the parents later on to make sure their coloring pad came with an invitation attached—this after you find a small stack of belly bands abandoned on the floor as a crumpled memory (run-on sentence to elicit drama). Obviously I am only speaking hypothetically!

1.19.2011

Mr. Messy: Birthday Invite Year 3


When Hendrix turned 3 we had a messy party. I’m totally cheating on this one because I had very little to do with the design process here. In fact, my only contribution involved formatting the party details on the back of the postcard invitations; not very exciting (and yes, I am a big fan of postcard correspondence. I once designed a postcard wedding invitation—at the bride’s request, can’t beat the cheap-o postage).


Hendrix designed the rest of the invitations himself by painting a unique image on the font of each card.


After all the invitations were dry, I helped Hendrix stick white Avery labels to the font of each card that said, “Let’s get messy.”


This party was Hendrix’s favorite to date—with certainly the best designed invitations to date. I loved each and every one of his creations.


By the way, if you ever host a messy party for your child you absolutely must have a kiddie pool full of wet spaghetti noodles, your kids will think you’re the coolest parent in the world and all the neighborhood children will agree.

1.18.2011

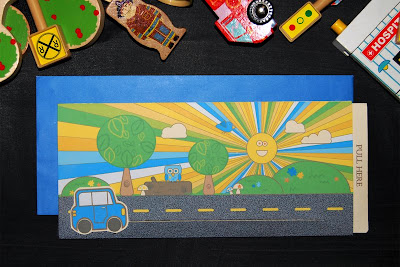
Car Cruising: Birthday Invite Year 2


Hendrix’s second year birthday party was more like a second year get-together. At this event, Hendrix had 3 friends over for cupcakes and a craft; Flintstone style ride-in cars made from cardboard boxes, construction paper and paint.


Since the only item scheduled on the party agenda was to make cars to cruise around in, I thought a car that traveled alongside a countryside scene would be most appropriate.


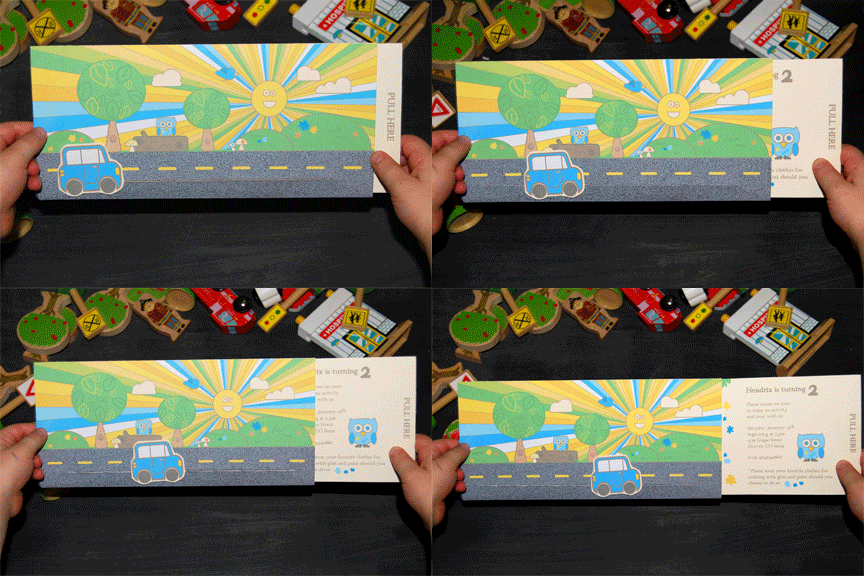
To make the car move this invitation had to have three parts. The first part of the invite displays a computer illustrated outdoor nature scene and road. This portion of the invitation is actually a folded pocket that the second part of the invitation slips into.


Pulling the side tab on second piece reveals all the party information. While the tab is pulled the car moves across the page. The car is the third portion of the invitation which completes the design.

Photobucket

My favorite thing about the end result is that the invitation is truly intended for the enjoyment of the invited child rather than for the child’s parent—although the design includes all the crucial event details that a parent should know.

1.17.2011

Getting Buggy: Birthday Invite Year 1

We are still full swing in holiday season around here because besides celebrating the birth of a new year we have so many family birthdays to honor this month. In fact, today my oldest's is five! His 5th year party invitations were hand delivered yesterday morning and the festivities will take place this Saturday. In tribute to birthday month, I decided to use this week of blogging to share some of the other b-day invitations I have designed for Hendrix in years past. Shall we?


His first birthday party was bug themed. I created this invitation using a felt-like Astroturf, plastic bugs and tiny dried flowers found at a yard sale. I also used a nice cover stock for the information portion of the invite.


The invite itself was postcard size and in postcard format so all the information was on the left panel of the card and the right side was left blank which would eventually be filled with the recipients mailing information—just like a standard postcard.


Next I cut rectangles from the Astroturf to match the size of the postcards. With glue I applied the turf to the front of the card and from there I added the other nature-like elements.


Each postcard was then inserted into clear cellophane bags in effort to protect the add-ons, labeled and then off to the post. There you have it, the great outdoors in a bag—or at least the appearance of such. 

1.12.2011

Happy (belated) Christmas


Lookie what I found; cellie photos of the third annual company holiday greeting card I designed for a company called CSI. Since the assembly of these cards required a couple all-nighters, I decided to dust these images off (not really because they were on my computer and I just clicked the upload button) and share them with you today for a little (belated) Christmas cheer.


Because the good folks at CSI like me so much, they pretty much let me have free rein when it comes to the design of their seasonal greeting card. The only thing they asked was that this year's message have an emphasis on the Christmas holiday. I knew these greeting cards would be hand delivered with a box of chocolates so beyond coming up with a Christmas-appropriate copy, I decided these cards should double as Christmas tree ornaments.


The inspiration for this project came from some beautiful paper mobiles a friend and I had used on a collaboration project a couple months previous to this assignment (but more on that later). For my paper stock I choose a gold patterned one from French Paper's Mod-Tone line and after much cutting, paper punching, scoring, folding and gluing, I assembled three different sized medallions together using thin jewelry wire. The greeting itself is inscribed on a flag that is attached to a gold cording from which the mini mobile hangs. As a final detail, I attached a greenish-gold bead to the top of the threading.


I liked the look of all the greeting cards hanging on a hook in one big bunch like a bouquet of flowers (don't mind the low quality phone photos). Now that I have had plenty of time to recooperate from this project I might have to pull out the paper cutter and repeat this craft for a little home decor, or maybe I'll just sit at the computer and look at these pictures instead which wouldn't require nearly as much effort...yeah, I choose that.

Check out past holiday greetings HERE and HERE

1.05.2011

Bread Crumbs: Another Decade


That is indeed a chocolate chip rainbow pancake-cake and crayoned birthday greeting you see, a little breakfast surprise from my sis and the boys. Getting old is the best.